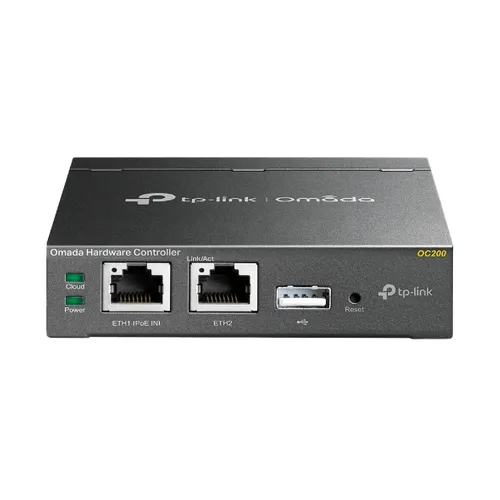
TP-Link OC200 | Omada Hardware Controller | 2x RJ45 100Mb/s, 1x USB, 1x microUSB, PoE 802.3af/at

The OC200 controller is specifically designed to provide centralized management of Omada networks. The device can monitor real-time statistics, view graphical analysis of network traffic, create an access portal, perform system upgrades and reboots, or easily scale the network to match your business growth.
Omada offers free cloud access with its own platform for centralized management. Take your network with you wherever you go.
Visitors have access to a secure Wi-FI network with a captive portal and separate wireless network technology. Newly added SMS authentication simplifies the connection process and Facebook login adds value to your company's social networking profile.
You can access the OC200 cloud controller from anywhere in the world and configure everything conveniently. All you need is a smartphone with the Omada mobile app.
Technical data: | |
Ports | 2 Ethernet 10/100Mbps ports 1 USB 2.0 port 1 Micro USB port |
Power supply | PoE 802.3af/at PoE or Micro USB(5V DC/ minimum 1A) |
Dimensions | 100×98×25mm |
Features | |
Wireless transmission functions | L3 Layer Management Functions Multi-SSID Bandwidth load balancing Bandwidth Control Airtime Fariness Beamforming Transmission Rate Limitation Wireless network scheduling QoS |
AP management | Automatic detection Uniform configuration Restart schedule Common firmware upgrade ON/OFF LED |
Wireless transmission security | Welcome page authentication Access control MAC Address Filtering Wireless client isolation SSID to VLAN mapping Detection of unauthorized APs |
Authentication | Welcome page |
Management | |
Omada application | Yes |
Central management | Up to 100 Omada access points, JetStream switches and SafeStream routers |
Access to the cloud | Yes |
Management L3 | Yes |
Multi-site management | Yes |
Management panel functions | Automatic device detection Batch configuration Batch software update Intelligent network monitoring Abnormal event warnings Unified configuration Restart scheduler Captive portal configuration |
Other | |
Certificates | CE, FCC, RoHS |
Contents of the package | Omada OC200 hardware controller Quick Installation Guide Ethernet cable |
System requirements | Microsoft® Windows®10, 8, 7,Vista™, XP or MAC® OS, NetWare®, UNIX® or Linux |
Work environment | Operating temperature: 0℃~40℃ (32℉~104℉); Storage temperature: -40℃~70℃ (-40℉~158℉) Operating air humidity: 10%~90% non-condensing; Storage temperature: 5%~90% non-condensing |
If you want to replace an existing router with an Omada Gateway on a working network, you will encounter some problems such as IP address conflict or adoption error. This article provides a recommended configuration process and helps you sort out the configuration process using the following network as an example.
All existing devices on this network have obtained IP addresses on the 192.168.68.0/24 subnet. However, the default IP address of the Omada Gateway LAN is 192.168.0.1, which is on a different subnet than the devices and will cause the adaptation to fail.
Step 1 - Renew IP addresses to enable communication
To obtain new IP addresses from the Omada Gateway, restart the OC200 by reconnecting the power line and connecting the PC directly wired to the gateway. As for the other devices, no operation is required.
Step 2: Check the IP address of the OC200
Open a browser on your PC and enter 192.168.0.1 in the address bar to visit the Omada Gateway management page. Set the user name and password for the first setup. Once logged in go to Network -> LAN -> DHCP Client List and you will find the IP address of the OC200 here, assuming it is 192.168.0.100.
Step 3: Apply Omada Gateway
Enter 192.168.0.100 in the address bar to visit the OC200 management page, go to Devices and there will be several devices there, as well as the Omada gateway in the Pending state. Click the gateway and apply it. On first adoption you may find an error notification, click try again and enter the username and password configured just now.
Step 4 - Change the LAN IP Address
Go to Settings -> Wired Networks -> LAN, edit the LAN, change the gateway / subnet to 192.168.68.0/24, update the DHCP scope and click Save, then the Omada Gateway system LED will start flashing, indicating a reboot. At this point, reboot the OC200 to make sure it gets the new IP address from the gateway.
Step 5 Check the operational status
When you notice that the gateway's Ethernet LED and the OC200's power LED are lit, disconnect the Ethernet cable from your computer and reconnect it to update the IP address. Then visit 192.168.68.1 and the OC200's IP address will be displayed at the bottom of the web page. Here in the image below, the OC200's IP address is 192.168.68.100. With the IP address, you will be able to log into the OC200 website and find that all devices are connected.